Ok so I've found some time and here are the answers (or not) to the problems you've been having lately.
Hope this helps :)
@WebSter5000: Go
I don't know how did I release the version without the volume material properly working. It'll be fixed in upcoming version.
What you can do in the meantime is to find this
@tommy34012: Go
So I took a look at the carrierwarpin.m3. I don't know where the problem is but it's surely not working as it should :)
I will investigate that further. Thanks for reporting it.
@MCSpanier: Go
I suspect that the ArtifactContainmentField is a file from the campaign. Did you unpack the textures also? :)
There is one more material type that is not yet supported by the importer and that may also be it.
@Kailniris2: Go
Also will be fixed in the upcoming update and also, thanks for reporting.
For now just remove the objects which are using the Terrain material type. It should help.
The exporter was supporting it but I messed up something (ie. Kailniris2's problem ;) ). As promised it will be fixed in upcoming version.
Just for the record - you have to use terrain (null) material.
First of all, i suck with english so I'm gonna use an image to explain myself ;).
Will Starcraft II Material have opacity?
I tried using Standard Material with my model, but the model didn't showed in Starcraft Editor.
I may missed something, I'm as good with 3D Max as with English. D:
I've just upladed 2.2 version of the M3 plugins. It could take some time before the system "refreshes" the change.
Anyway, here's the mini-manual for what I have done ;)
Ribbons:
Ribbons now are importable and exportable. You can create your own ribbons whenever and wherever you wish.
Take a few moments to familiarize yourself with the interface provided. I think that the options' names are quite self-explanatory.
Although, I'd love it to be as much what-you-see-is-what-you-get and to some extend is, I'd really would like the helper object to be more representable.
The main thing about ribbons is that they are so much dependent on the bone to which they are attached. If you notice, there is no parameter like frequency or noise scale. The movement and the "waviness" of this effect comes from the movement of the bone.
Great example is the corruptor model.
Tight and Fuzzy hit tests:
Now these tests are really important to the compatibility of the custom model with the game itself. Every model that is clickable in the game has those two tests (of course it is not mandatory to the bushes or trees objects, only the clickable ones).
So it's rather important that you include those two in the next export that you do :)
What is the difference?
If you open up the editor, there any unit model (let's take again - the corruptor) and click RENDER -> SHOW GEOMETRY -> HIT TESTS you can see that there are a few capsules.
The blue one is the tight test and it is used when the game tries to figure out whether you are including the unit with the box selection method or not.
The green one is the fuzzy test and it is used when you click the unit to select it.
There can be only one tight test in the scene, but you can have as many fuzzy tests as you want. Tight test should encapsulate the entire model within it, fuzzy test should build less overall shape of the model.
I strongly recommend checking out original models to figure out what method of placing those is the right one.
Bone flags:
When you import a model, the scripts will find and include the bone flags during the import phase. You can access flag manager from the same menu as you were launching the M3 - Import or M3 - Export.
If you create new bones, you won't have any flags on them. To add the flags just click "Import\Update bones" button in the M3 - Bone Tools and you can do whatever you want.
If you forget to do that, don't worry. During the export, the script will assign somewhat default flags to the exported bones.
I haven't really played with it much but it's there :)
Skin and bone attach changes:
If you click on ribbon, pemitter, tight or fuzzy test you'll notice that there is this common button with label "Parent:"
In this version, if you won't attach the sc2helpers to the bones or if you won't skin the geometry, the script will not do it during the export phase. I did this to increase the compatibility and to have this "user-side-check" whether everything is ok or not.
If you look at the M3 - Export menu, you can see two new buttons there. One is "Scene check" and the other is "Add bone"
"Scene check" checks if scene if ready to be exported without any errors and if it will look as expected on the editor side. If the script finds any errors it will report them in the pop-up window and print them into the listener.
"Add bone" adds bones to the selected helpers and geometry. The bones are added in the pivot points of selected objects, one by one. If the object is geometry then it will add skin modifier, create a bone and add this bone to the skin. If the object is a sc2helper then it will create bone at it's pivot and attach the object to the bone.
Of course you'd have to handle all the hierarchy but for creating static objects to use in game or to test I find this rather usefull :)
If you use the PICK BUTTON provided with the helpers, you will see that it will bring down the helper to the bone's position. That's because the helper's transformation is irrelevant. The only thing that matters is bone's transformation.
Except if you are picking a bone for tight or fuzzy test. These tests can have their own set of transformations which are added to the bone's transformations. Resulting transformation is the one that will be taken under consideration in game.
Layer manager:
After importing any asset, all that makes the .m3 file will be distributed to different layers. That's there to add a bit of tidiness to the scene.
Created layers will be:
0. default
1. Geometry
2. Bones
3. Attachments and Bounding sphere
4. Hit tests
5. Particles, Ribbons and Forces
6. Lights and Cameras
7. Projections.
Obviously, projections will be empty as this version does not support it :)
Anyway, 2nd, 3rd and 4th layer is always hidden. You can unhide it by going to the "Manage Layers..." options and clicking on the light-bulb icon.
Everything is there, just not visible.
Other thing to note is that if the model contains any lights, it may be 100% black after import. Just right click on the viewport's shading method and change from scene lights to default lights illumination method.
I believe that this is all. If you have any questions or bug reports just post here and I will do my best to answer/fix it :) <3
Yeah, I didn't do anything with those files so you have the old version :)
The bling animation is what Triceron found out some time ago and I didn't fix that bug. It's a skinning thing
@Roar_Man: Go
That's the worst error you've encountered: it says nothing :/ What .m3 file are you importing?
@MCSpanier: Go
I'll look into it when I have some time.
I'm using 3ds Max x64, x32 is not installed. I have Windows 7 Home Premium x64 on a AMD 8-Core Computer, maybe this helps you.
<<quote 1092760>>@Roar_Man: Go" That's the worst error you've encountered: it says nothing :/ What .m3 file are you importing? "
It happesn when I try to export a WoW model. The exact messege is "Unknown System Exception" and points to this piece of code in max script:
akey.stcInd = M3E_findSTCframe akey.frame
@Roar_Man: Go
But which WoW model?
Leruster please fix this bug:
Ok I'll fix problem that I know nothing of :) Details! What .m3 file, what were you doing when the problem appeared, maybe attach the .max file?
simple import-export TerrainObjectZhakulLibraryLarge.m3. Terrain (Null) error
Ok so I've found some time and here are the answers (or not) to the problems you've been having lately. Hope this helps :)
@WebSter5000: Go I don't know how did I release the version without the volume material properly working. It'll be fixed in upcoming version. What you can do in the meantime is to find this
and remove it or add double - before it.
You won't have that error any more.
@tommy34012: Go So I took a look at the carrierwarpin.m3. I don't know where the problem is but it's surely not working as it should :) I will investigate that further. Thanks for reporting it.
@MCSpanier: Go I suspect that the ArtifactContainmentField is a file from the campaign. Did you unpack the textures also? :) There is one more material type that is not yet supported by the importer and that may also be it.
@Kailniris2: Go Also will be fixed in the upcoming update and also, thanks for reporting.
For now just remove the objects which are using the Terrain material type. It should help.
Thanks for the correction. For me Terrain(Null) a material would be needed.
It was a Quillboar character, and it even happens with a custom .m3 model.
@Leruster: Go
Btw, what about that feature some doodads have? When terrain texture is projected to the model's texture? Can or will exporter support it?
@Zolden: Go
The exporter was supporting it but I messed up something (ie. Kailniris2's problem ;) ). As promised it will be fixed in upcoming version. Just for the record - you have to use terrain (null) material.
@Leruster: Go
any news when the exporter would be able to support splats that Move with the terrain? http://img716.imageshack.us/img716/3969/heroglow.jpg
I wanna use the Pylon Splat and I think i just need to change the alpha settings :P.
@Taintedwisp: Go
Won't editing the texture do the trick?
As I said before, projections will be available with the next version :)
@Leruster: Go
First of all, i suck with english so I'm gonna use an image to explain myself ;).
Will Starcraft II Material have opacity?
I tried using Standard Material with my model, but the model didn't showed in Starcraft Editor. I may missed something, I'm as good with 3D Max as with English. D:
Thanks.
@user_251484: Go
You have to use greyscale map in alpha mask map in the StarCraft II material for the opacity to work.
I've just upladed 2.2 version of the M3 plugins. It could take some time before the system "refreshes" the change.
Anyway, here's the mini-manual for what I have done ;)
Ribbons:
Ribbons now are importable and exportable. You can create your own ribbons whenever and wherever you wish.
Take a few moments to familiarize yourself with the interface provided. I think that the options' names are quite self-explanatory.
Although, I'd love it to be as much what-you-see-is-what-you-get and to some extend is, I'd really would like the helper object to be more representable.
The main thing about ribbons is that they are so much dependent on the bone to which they are attached. If you notice, there is no parameter like frequency or noise scale. The movement and the "waviness" of this effect comes from the movement of the bone.
Great example is the corruptor model.
Tight and Fuzzy hit tests:
Now these tests are really important to the compatibility of the custom model with the game itself. Every model that is clickable in the game has those two tests (of course it is not mandatory to the bushes or trees objects, only the clickable ones).
So it's rather important that you include those two in the next export that you do :)
What is the difference?
If you open up the editor, there any unit model (let's take again - the corruptor) and click RENDER -> SHOW GEOMETRY -> HIT TESTS you can see that there are a few capsules.
The blue one is the tight test and it is used when the game tries to figure out whether you are including the unit with the box selection method or not.
The green one is the fuzzy test and it is used when you click the unit to select it.
There can be only one tight test in the scene, but you can have as many fuzzy tests as you want. Tight test should encapsulate the entire model within it, fuzzy test should build less overall shape of the model.
I strongly recommend checking out original models to figure out what method of placing those is the right one.
Bone flags:
When you import a model, the scripts will find and include the bone flags during the import phase. You can access flag manager from the same menu as you were launching the M3 - Import or M3 - Export.
If you create new bones, you won't have any flags on them. To add the flags just click "Import\Update bones" button in the M3 - Bone Tools and you can do whatever you want.
If you forget to do that, don't worry. During the export, the script will assign somewhat default flags to the exported bones.
I haven't really played with it much but it's there :)
Skin and bone attach changes:
If you click on ribbon, pemitter, tight or fuzzy test you'll notice that there is this common button with label "Parent:"
In this version, if you won't attach the sc2helpers to the bones or if you won't skin the geometry, the script will not do it during the export phase. I did this to increase the compatibility and to have this "user-side-check" whether everything is ok or not.
If you look at the M3 - Export menu, you can see two new buttons there. One is "Scene check" and the other is "Add bone"
"Scene check" checks if scene if ready to be exported without any errors and if it will look as expected on the editor side. If the script finds any errors it will report them in the pop-up window and print them into the listener.
"Add bone" adds bones to the selected helpers and geometry. The bones are added in the pivot points of selected objects, one by one. If the object is geometry then it will add skin modifier, create a bone and add this bone to the skin. If the object is a sc2helper then it will create bone at it's pivot and attach the object to the bone.
Of course you'd have to handle all the hierarchy but for creating static objects to use in game or to test I find this rather usefull :)
If you use the PICK BUTTON provided with the helpers, you will see that it will bring down the helper to the bone's position. That's because the helper's transformation is irrelevant. The only thing that matters is bone's transformation.
Except if you are picking a bone for tight or fuzzy test. These tests can have their own set of transformations which are added to the bone's transformations. Resulting transformation is the one that will be taken under consideration in game.
Layer manager:
After importing any asset, all that makes the .m3 file will be distributed to different layers. That's there to add a bit of tidiness to the scene.
Created layers will be:
0. default
1. Geometry
2. Bones
3. Attachments and Bounding sphere
4. Hit tests
5. Particles, Ribbons and Forces
6. Lights and Cameras
7. Projections.
Obviously, projections will be empty as this version does not support it :)
Anyway, 2nd, 3rd and 4th layer is always hidden. You can unhide it by going to the "Manage Layers..." options and clicking on the light-bulb icon.
Everything is there, just not visible.
Other thing to note is that if the model contains any lights, it may be 100% black after import. Just right click on the viewport's shading method and change from scene lights to default lights illumination method.
I believe that this is all. If you have any questions or bug reports just post here and I will do my best to answer/fix it :)
<3
@Leruster: Go
It's cool !!!! :)
But it seems that it's using an old version of "impexpmdx_v2.0.4.ms" and "m2_import_v0.304b.ms" in the new 2.2 Compressed Package “> <”~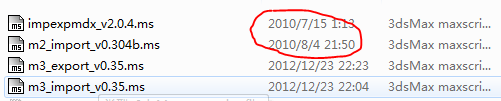
And there is still something wrong when exprot some model(m3->max->m3)
here is a Banling and Zealot WarpIN
@tommy34012: Go
Yeah, I didn't do anything with those files so you have the old version :)
The bling animation is what Triceron found out some time ago and I didn't fix that bug. It's a skinning thing
Thank you very much, I am very curious about the new features!