Tutorial - Playing between quests
Special notes about the features
The system stores many of intern variables. The only way to edit these variables is to use get and set functions, included in the library. To be functional, the system requires a number of constant values, and you must consider a number of important constant others values.
Constant values (cannot be edited)
Make sure your number of total quests doesn't exceed the number of 50 quests. When you create a quest, a number of 25 text tags can be created on each Unit-type used as Start Unit or End Unit. If the number of the unit-type units on the map is more than 25, the text tags may not appear on all units (but the others functions don't have problems).
- Tip
- You can edit the limits by editing the library variables (do NOT uncheck the array box) and by editing constant internal values.
Others notes
Only Heroic units can talk to PNJ to have quests on the first version of the library. Be carreful, it's not the type of unit (Hero), but the attribute of unit (Heroic).
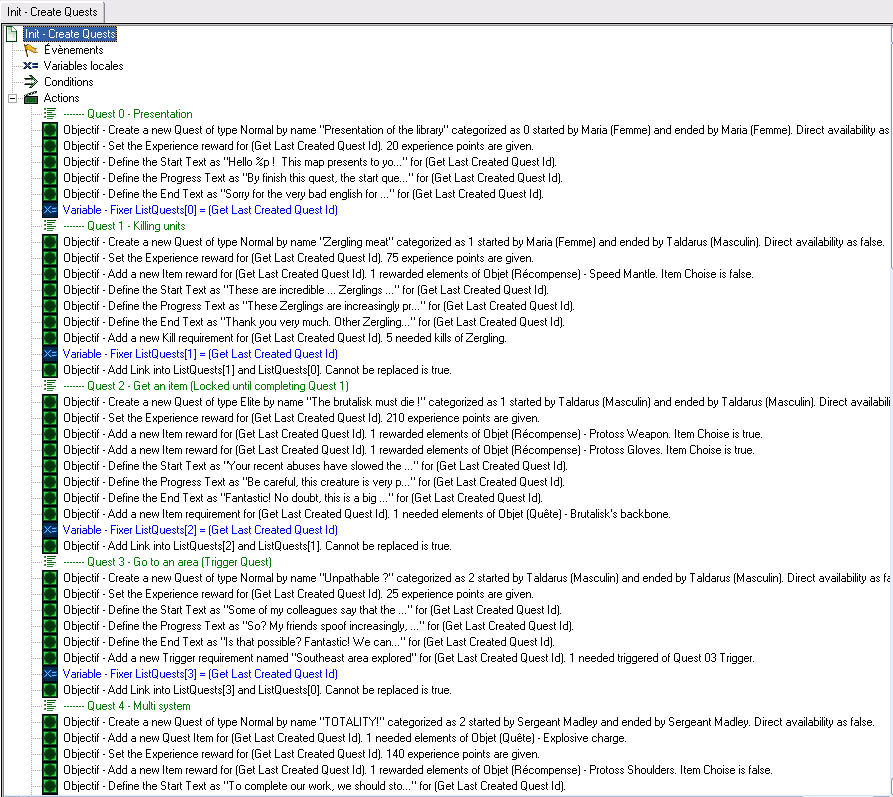
How to make a first quest ?
Create a category
The first thing is to create a first category for your first quest. To do that, use this function:
Objective - Create a new Category Quest(<1>)
- 1: The quest category name.
Very easy for the moment. This function create a category. You can get the Category Id by using the function "Get Last Created Quest Category Id". It's an integer value. You will use this integer value in others functions to refers to this category. Be carreful, this getter function is not protected for multiple threads (be carreful with Wait actions !)
Create the quest
Next, use this function :
Objective - Create a new Quest(<1>, <2>, <3>, <4>, <5>, <6>)
- 1: The quest name.
- 2: Category Id. Use the function "Get last Created Quest Category Id" here.
- 3: Start Unit type. All units of this unit-type have this quest.
- 4: End Unit type. All units of this unit-type have this quest.
- 5: Availability. Set to "Direct Availability".
- 6: Type. The type is shown in the quest name in Quest Log and in the Objectives list (top-left on the screen). For the moment, set this value to "Normal".
As the last function, you can get the last created Quest Id by the getter "Get Last Created Quest Id". It's also an integer value. If you must use this trigger to others functions or triggers, create an array global integer variable to save these Ids.
Set Text information about the quest
You can now set all specifications for your quest. To begin, use these 3 functions :
        Objective - Define Start Text for Quest Id(<1>, <2>)
        Objective - Define Progress Text for Quest Id(<1>, <2>)
        Objective - Define End Text for Quest Id(<1>, <2>)
The first parameter is a text value. The Start text is when your hero have the proposal of the quest (with Accept/Decline buttons). The Progress text is shown when you take the quest, but not completed. The End Text is shown when the quest is finished. The second parameter refers to the quest id. Use the function "Get Last Created Quest Id".
Set the rewards for this quest
Imagine, your quest will offer to your hero (when ended) 250 Experience and a choise between 2 items.
Create the 2 items. Make sure you create a button for this item and link the item with this button. The icon of the item shown in the quest window is defined by the button icon.
Now, go to Trigger editor and add this function:
Objective - Set Experience Reward to Quest Id(<1>, <2>)
- 1: The amount of experience.
- 2: Quest Id. Use the function "Get last Created Quest Category Id" here.
Add these 2 functions:
        Objective - Add Item Reward to Quest Id(Choise mode, 1, Aucun lien de jeu, 0)
        Objective - Add Item Reward to Quest Id(Choise mode, 1, Aucun lien de jeu, 0)
- 1: The choise mode. Choose the preset "Choise mode". This option forces the player to choise an item between all items set in "Choise mode".
- 2: The count of this item.
- 3: Item-type. Set the created items here.
- 4: Quest Id. Use the function "Get last Created Quest Category Id" here.
Set the requirements for this quest
Use this function:
Objectif - Add Kill Requirement to Quest Id(<1>, <2>, <3>)
- 1: The Count of kills needed.
- 2: The unit-type to kill.
- 3: Quest Id. Use the function "Get last Created Quest Category Id" here.
Your first quest is finished. Congratulations!
Quests Links
Create another quest. This quest will be available only if the first quest is completed. To do that, you must save the Ids of all created quests in an array global integer variable.
To link a quest, you need 2 things. In the Create Quest function, set the Availability mode to "Linked Availablity".
Next, use this function:
Objective - Add Link into Locked Quest Id And Completed Quest Id(<1>, <2>, <3>)
- 1: Locked Quest Id. Use here the "Get Last Created Quest Id" function. It's the locked quest id you want to unlock when the Completed Quest Id is finished.
- 2: Completed Quest Id. Set here the Completed Quest Id (saved in the array).
- 3: Limitation system. This refers to the OR and the AND operators. Use "Can be replaced" to refers to OR operator. Use "Cannot be replaced" to refers to AND operator.
By the way, when you use AND operator, if you have multiple links for a quest, the player must finish all completed quests to unlock the locked quest. To do that, it's very easy:
        Objective - Add Link into Locked Quest Id And Completed Quest Id(3, 1, Cannot be replaced)
        Objective - Add Link into Locked Quest Id And Completed Quest Id(3, 2, Cannot be replaced)
This example code shows you the links for the locked quest id 3. To unlock this quest, the player must finish the quests 1 AND 2.
If you use the OR operator:
        Objective - Add Link into Locked Quest Id And Completed Quest Id(3, 1, Can be replaced)
        Objective - Add Link into Locked Quest Id And Completed Quest Id(3, 2, Can be replaced)
If the player finish the quest 1 OR 2, the locked quest id 3 will be unlocked.
Escort Quest
Create a new quest with normal parameters (Start Unit-type, End Unit-type, Start Text, Progress Text, ...)
After that, create a new trigger named "Escort for the Quest Z". This will be the escort management used for the escort quest. Add a new Event to this quest id. Refers this last created trigger as value. Add also a new Trigger Requirement to the same quest id. Refers the same trigger.
In the escort trigger, use these 2 functions:
        Objectif - Set the Escort Requirement by Quest Id for Player as UnitGroup. Linked Trigger is Trigger.
        Objectif - Launch the Escort verification by Quest Id for Player. Ends when Escorted Units dies or reaches Point.
The first function set the escorted units. It's a unit group. The second function launches the routine to check if the quest is failed or achieved.
Be carreful if you use wait actions on your trigger. It's possible that your unit group doesn't exist anymore. Use check functions to be sure the trigger doesn't generate errors:
        Unit - Wait until All Units in (Unit Group(EscortUnit)) becomes inactive
        General - If (Conditions) then do (Actions) else do (Actions)
                All Units in (Unit Group(Escort Unit)) are died) == false
                (...)
Comments