Alright, there have been troubles importing WoW characters using WoWModelViewer for some time now, and a few people have been using a 3DSMax work-around
Well, the current version of WoWModelViewer will export the character's model just fine, it simply forgets the attached models ( shoulder armor/weapons ) XD
Here's a little tutorial on how to fix that. ( I apologize if it may be hard to read -.- )
Make sure it's the latest version, DevWork is good, but the full version now includes M3 exporting.
Also: make sure your copy of World of Warcraft has been updated to the latest patch! If you do not have World of Warcraft installed, just start a free trial and install it for free!
Open up the WoWModelViewer and open the "character" tab on the left side.
Open a race tab and gender tab and click on the .m2 model to open the character.
Select any skin tone, hair style, etc. and any equipment (you can load gear sets or npc items), and make sure to save it just in case!
You can also import any character from the armory.
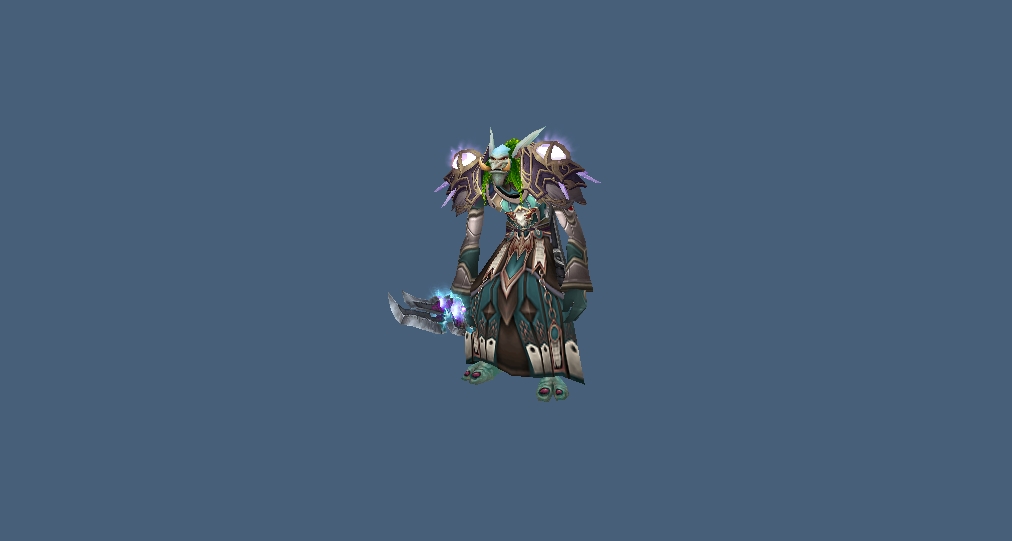
I used an old version of my mage:
Now that you've got a fully equipped character, open Export Options, set the "preferred exporter" to M3, and open the M3 tab. This contains all information about the model.
Don't touch bounds radius or sphere scale.
I haven't tried texture path yet, but I believe it will rename your texture ( atm it names all character textures "Body.tga", which will cause problems if you import more than one ).
Animations
Select the attack animations you want to use, the defaults are "Attack1H" for 1-Handed weapons, "Attack2H" for 2-handers, "Attack2HL" for staves/polearms, "AttackOff" for the off-hand, "AttackOffPierce" for offhand daggers, and "AttackUnarmed" for unarmed characters.
Rename all the selected Attack animations to "Attack" and press apply.
"Run", "Stand", and "Death" are always selected by default. To use "Run" in-game, rename it "Walk" and press apply.
Select any spell animations you want to use, rename the "ReadySpell" version "Spell", and the "SpellCast" version "Spell End".
You can rename "EmoteWork" to "Work" to play that animation for gatherers.
That's enough basic animations for the character to work in Sc2, although emotes, etc. can be added as well.
Exporting
Now the base character model is ready to be exported.
Open File -> Export Model -> M3
Choose the location (make sure it is in the same folder as any other models you are using!) and name of the model file, and click save.
Now, that did not export the character's shoulder armor or weapons, so we'll need to export those as well...
Armor/Weaponry
----
Shoulder Armor:
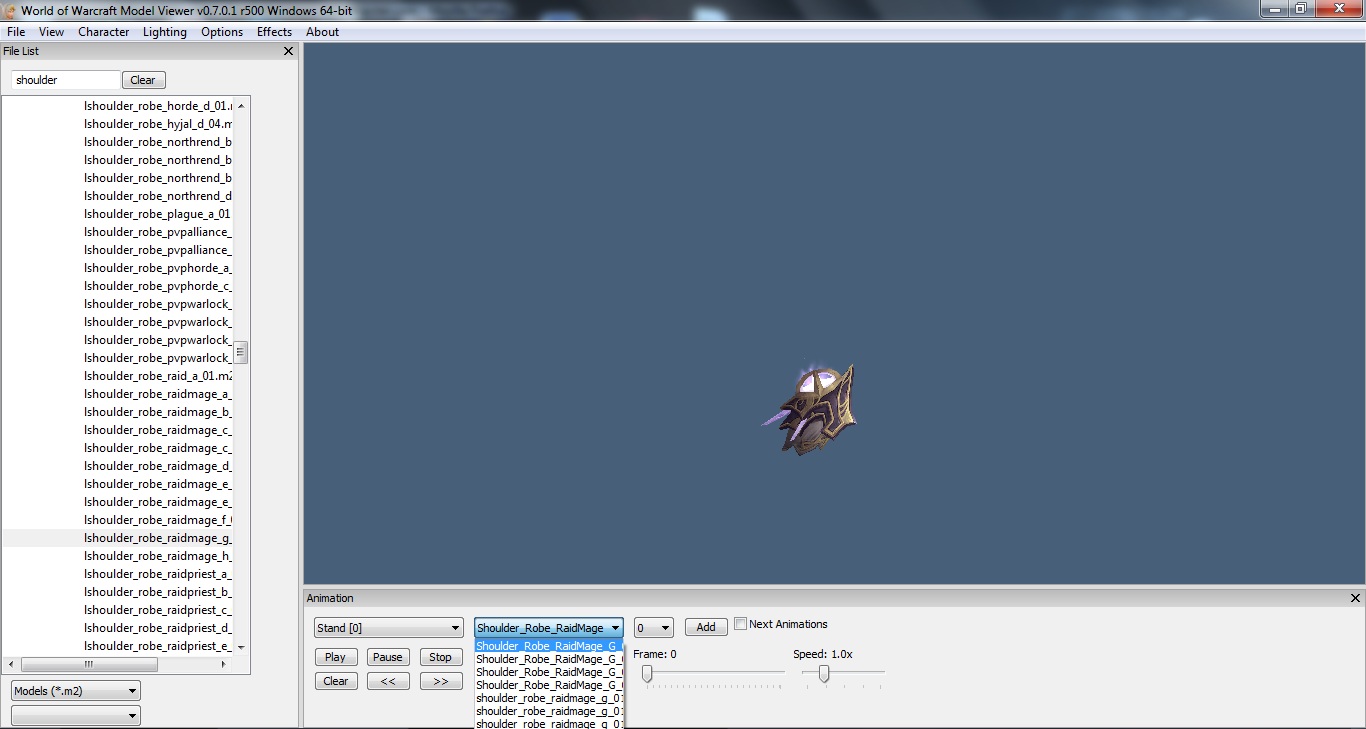
On the File List menu, search for "Shoulder" and press enter.
Close the "Spell" and "World" tabs, so only the "Objectcomponents" tab is open.
This contains all of the models for shoulder armor in WoW, with handy file names that tell where it comes from and what type of armor it is.
In my case, I'm looking for the Mage T8 Shoulders, which happens to be named "lshoulder_robe_raidmage_g_01" (the alphabet designates tier levels, tier 7 is under tier 3, and tier 9 is named argent)
Once the model is selected, you can use a drop-down menu along the bottom to choose the desired texture.
Once the model and texture are selected, it is ready to be exported. Open File->Export Model->M3
Choose a path (make sure to put it in the same folder as your character's model!) and file name, then click "save".
Now, do the same for the right shoulder (same filename, but it'll start with 'rshoulder' instead of 'lshoulder') (OR select a completely different right shoulder to be used!)
----
Weapons:
Now that you've got shoulder armor, it's time to make a weapon!
In the File List, search for "weapons" (once again, close out of every tab but "Items->Objectcomponents")
Just like the shoulders, search for the weapon you want, choose its texture, and export it.
Now to put them all in-game!
Importing
This is important to get right, as for some reason it has to be imported in a certain order.
Open your Sc2 map, select the Importer (F9)
Import ONLY THE TEXTURES.
Save your map, exit the editor, re-open the editor, and open the map
Now you can import the Model files the same way (but don't exit the editor, just save it)
Attachments
Now, open your character's model in the Previewer
(for basic controls, leftclick+moving mouse will pan along the y axis, and rightclick+moving mouse will pan along the z axis, zooming seems to have "diminishing returns" o.0)
Use any combination of zooming/panning to get a closer look of your character.
----
Now, along the right side of the screen there should be a window containing folders filled with information about the model. Above that are little boxes with various icons.
Click the one shaped like a pyramid to open the folder for Attachment Points.
Now along the top bar, open "Render"->"Show Geometry"->Attachment Points
This shows all of the available places to attach objects to on the character, and there's quite a few xD It'd take a long time to test and find out which is which...
But this is interesting... clicking on on of the attachment points will actually tell you which one it is - thank you Blizzard! :D
If you click on one of the points in the folder, the corresponding pyramid on your character will begin to fluctuate in size, letting you know where it is.
Similarly, clicking on an attachment point on the character and then clicking on white space in the folder will highlight the corresponding point name.
----
Select the attachment point on the character's left shoulder so it bounces, then click on any empty space under the "Attachment Points" folder. REF_Hardpoint 01 should be highlighted.
Similarly, the right shoulder attachment should point to REF_Hardpoint 02.
Write these down or try to remember them!
*Note: The hardpoints do vary based upon race, with the exception of weapons left/right.
REF_Weapon Left/Right are clearly named and don't need to be discovered.
----
Now, I will assume you know the basics of Models and Actors, and if not you should read this tutorial.
----
Create a Model of type Generic based on CModel
Set the model to your left shoulder
Do the same for the right shoulder and weapon(s)
Create a Model of type Generic based on GenericUnitBase
Set the model to your character, and turn on Occlusion if you want to seem it behind buildings.
----
Now for the actors... either create a Unit actor from scratch, or simply duplicate a pre-existing actor for your character.
Set the model to your character's model.
Now, create a new Actor of type Model based on Model Addition
Set the model to the left shoulder
Set Scale to (2.0,2.0,2.0) (unless you want tiny orc shoulders)
----
Under Events, create these events:
UnitBirth.(character's unit)
-Create
ActorCreation
-AnimPlay Attach Stand
UnitDeath.(character's unit)
-Destroy
----
Now under Host, select Actor and set the host to your character's actor.
Under Host Site Operations, add SOpAttachHardPoint02
do the same thing for your right shoulder, only set the Site Operation to SOpAttachHardPoint01
----
If you have any weapons, create actors in the same way as the shoulders, only set the Site Operation to SOpAttachWeaponRight and SOpAttachWeaponLeft respectively
Now you should have a character actor that, once attached to a unit, will be complete with shoulders + weapons! (b^.^)b
Note: I did not attach any weapons to my unit, simply because I did not need them for my map.
Thanks for making this, it really helped me learn how to attach my "loose gear" to my wow models. Great guide.
There are some things however that I think you should note in it:
not all character models seems to have the same names on the attachments, the broken draenei for example uses hardpoint 3 and 4 for shoulders.
And for some reason I had to turn off fog of war on my equipment or it would show as very shady all the time.
Oh and btw, the link to the modelviewer doesn't work for some reason, but the adress is correct
Nice job on the tutorial! I need to start giving back and write a few myself.
I noticed that when I import my textures/models, I don't need to restart the SC2 Galaxy Editor.
My Steps:
1. Import TEXTURE(S) FIRST as it says above.
2. Save.
3. Import Model.
4. Save.
If you find it crashing, then stick to the OP's method. Also, if anyone is having problems staying under 10MB I'll be writing a tutorial (if one doesnt exist) on how to shrink the size of texture image files down to about 10% of their current size which is 1-2MB for Expansion 2,3 models and 256KB for Original.
@simras
The attachment points seem to be the same when dealing with models from the same expansion and this: "And for some reason I had to turn off fog of war on my equipment or it would show as very shady all the time." BUGGED ME FOR DAYS until I finally figured it out. Some units had the dark attachments and others were fine...drove me nuts. What I wanted to say to you, if you're having problems with the viewer (or even if youre not) is to download each release of the WoW Model viewer and keep them in a directory because some of the older versions will give you different models and export them differently. The newer releases are better M3 files, but they ignore the oldworld.mpq so you miss out on some models.
If you find it crashing, then stick to the OP's method. Also, if anyone is having problems staying under 10MB I'll be writing a tutorial (if one doesnt exist) on how to shrink the size of texture image files down to about 10% of their current size which is 1-2MB for Expansion 2,3 models and 256KB for Original.
awesome (b^.^)b
and if you still have the "oldworld.mpq" file on your hard drive (i still do, and it's only 3 days to cataclysm), i believe you can manually add it to the list of mpq files the model viewer uses.
also: i have updated the tutorial with the information about hardpoints, and will continue to edit it with any new information people find
When I do that, it still ignores it. I noticed while looking at the source code that it's intentional for them to remove the oldworld.mpq models. I am able to use older versions to get those models, however.
I believe I figured out how to import multiple WoW characters using this method...
WoWModelViewer exports the model's texture as "Body.tga", no matter what type of character you export (unless it's a creature, item, or doodad model, such as The Lich King, Thunderfury, or Catapult)
That combined with the inability to import models into different folders means you can effectively only have one working character at a time.
My idea, is to take the "Body.tga" of every character, rename it what you want after exporting it, and import it as usual. After creating the Actor data for each character, I think that using an "Event -> Actor Creation -> Texture Swap" should allow you to apply the texture you need to the model :D
If this works, it should even add more customization to each model, as you can actually swap textures in-game to show the character in different armor!
Great Tut stumbled across it, thought id try it out and now i have the litch king pwning waves of undead XD
Does your method for importing multiple characters work ( i tried and im not able to find a 'texture swap' when i create and event - actor creation)? cause thats essential for a map im planning on making
How do you import the textures of multiple characters? they seems to only keep their textures in SC2 if u leave the name of the .tga file as "body" but u cant upload more than 1 "body" without SC2 trying to over right the first. i tried simply renaming the file, but then the texture isnt applied to the model.
Blizzard apparently has some method of texture swapping that they used for the protoss/dark protoss structures
I've been trying to figure out how to replicate that, but it will take some time and I haven't been working with Sc2 in the past few months =(
I've gotten multiple characters to work by forcing the viewer to export textures to a different directory.
I go into File->Export Model->Export Options and then input, for example, orc_grunt in the texture path. I then export the model as usual and it saves the texture to \orc_grunt.
In the editor I then import the texture and model as usual.
Now, since you told the viewer to export with a texture path, the .m3 expects the texture to be in that path off of root.
In my editor's import module I've got:
orc_grunt.m3
\orc_grunt
body.tga
I actually put orc_grunt.m3 into the orc_grunt folder in the import module for the sake of organization, but it's not necessary.
So for your next character .m3 you just go back into Export Options and change the directory. This seems to work wonderfully.
And here are 3 separate character models I successfully imported:
There. Well, I hope that demonstrates the validity of my claim and encourages more of you out there to import multiple character models!
:P
Take care.
EDIT: I just wanted to add as a reminder that the .m3 files do NOT have to be in the same directory as their Body.tga files. When I imported them they were in the root directory and I just stuck them in the folder their .tga was in for organization purposes. Just remember that when you export the .m3 the texture gets a path inside the .m3 where SC2 expects to find it. If you DON'T specify a path (i.e., leave the texture path blank) then the .m3's texture is expected in SC2's root directory. This would be why all of the Body.tga textures conflict and you can only have one at a time.
I was wondering what that field was for...
thanks for giving us this information (and saving me some time XD) (b^.^)b
Finally people have away to mass-import highly-customizable Sc2 models :D (space issues are supposedly solved by llou's method)
edit:
I may still look into the texture variation method, as it has potential to save space and reduce complexity (have model switch gear without switching models)
Have you been able to get local offsets to work with this method? Everytime I try to add any sort of SiteOp to an attachment on a WoW model it ceases to track with the animations, yet native SC2 models work fine.
Still not working for me either, but I would like to note that the SiteOps DO work, as long as the model is not in its standing animation. For example, if the unit is running/walking, then the SiteOps seem to work fine and the modelattachment follows the hardpoint. Its only when the unit stops that things fall apart.
For anyone who might know, why is this? Is it something the maker of the wowmodelviewer is working on?
And before I forget I'd like to offer high praise to said maker. The program is awesome. 'Nuff said.
Take care.
EDIT: You can even simulate this by selecting the unit with the modelattachment+siteop, holding down CTRL while left clicking the ground and then holding the button down while dragging your mouse around to turn the unit. As long as you're turning the unit the siteop seems to work.
Alright, there have been troubles importing WoW characters using WoWModelViewer for some time now, and a few people have been using a 3DSMax work-around
Well, the current version of WoWModelViewer will export the character's model just fine, it simply forgets the attached models ( shoulder armor/weapons ) XD
Here's a little tutorial on how to fix that. ( I apologize if it may be hard to read -.- )
First things first...
*You NEED to download WoWModelViewer from this site: http://code.google.com/p/wowmodelviewer/downloads/list
Make sure it's the latest version, DevWork is good, but the full version now includes M3 exporting.
Also: make sure your copy of World of Warcraft has been updated to the latest patch! If you do not have World of Warcraft installed, just start a free trial and install it for free!
Open up the WoWModelViewer and open the "character" tab on the left side.
Open a race tab and gender tab and click on the .m2 model to open the character.
Select any skin tone, hair style, etc. and any equipment (you can load gear sets or npc items), and make sure to save it just in case!
You can also import any character from the armory.
I used an old version of my mage:
Now that you've got a fully equipped character, open Export Options, set the "preferred exporter" to M3, and open the M3 tab. This contains all information about the model.
Don't touch bounds radius or sphere scale.
I haven't tried texture path yet, but I believe it will rename your texture ( atm it names all character textures "Body.tga", which will cause problems if you import more than one ).
Animations
Select the attack animations you want to use, the defaults are "Attack1H" for 1-Handed weapons, "Attack2H" for 2-handers, "Attack2HL" for staves/polearms, "AttackOff" for the off-hand, "AttackOffPierce" for offhand daggers, and "AttackUnarmed" for unarmed characters.
Rename all the selected Attack animations to "Attack" and press apply.
"Run", "Stand", and "Death" are always selected by default. To use "Run" in-game, rename it "Walk" and press apply.
Select any spell animations you want to use, rename the "ReadySpell" version "Spell", and the "SpellCast" version "Spell End".
You can rename "EmoteWork" to "Work" to play that animation for gatherers.
That's enough basic animations for the character to work in Sc2, although emotes, etc. can be added as well.
Exporting Now the base character model is ready to be exported.
Open File -> Export Model -> M3
Choose the location (make sure it is in the same folder as any other models you are using!) and name of the model file, and click save.
Now, that did not export the character's shoulder armor or weapons, so we'll need to export those as well...
Armor/Weaponry
----Shoulder Armor:
On the File List menu, search for "Shoulder" and press enter.
Close the "Spell" and "World" tabs, so only the "Objectcomponents" tab is open.
This contains all of the models for shoulder armor in WoW, with handy file names that tell where it comes from and what type of armor it is.
In my case, I'm looking for the Mage T8 Shoulders, which happens to be named "lshoulder_robe_raidmage_g_01" (the alphabet designates tier levels, tier 7 is under tier 3, and tier 9 is named argent)
Once the model is selected, you can use a drop-down menu along the bottom to choose the desired texture.
Once the model and texture are selected, it is ready to be exported. Open File->Export Model->M3
Choose a path (make sure to put it in the same folder as your character's model!) and file name, then click "save".
Now, do the same for the right shoulder (same filename, but it'll start with 'rshoulder' instead of 'lshoulder') (OR select a completely different right shoulder to be used!)
----Weapons:
Now that you've got shoulder armor, it's time to make a weapon!
In the File List, search for "weapons" (once again, close out of every tab but "Items->Objectcomponents")
Just like the shoulders, search for the weapon you want, choose its texture, and export it.
Now to put them all in-game!
Importing
This is important to get right, as for some reason it has to be imported in a certain order.
Open your Sc2 map, select the Importer (F9)
Import ONLY THE TEXTURES.
Save your map, exit the editor, re-open the editor, and open the map
Now you can import the Model files the same way (but don't exit the editor, just save it)
Attachments
Now, open your character's model in the Previewer
(for basic controls, leftclick+moving mouse will pan along the y axis, and rightclick+moving mouse will pan along the z axis, zooming seems to have "diminishing returns" o.0)
Use any combination of zooming/panning to get a closer look of your character.
----Now, along the right side of the screen there should be a window containing folders filled with information about the model. Above that are little boxes with various icons.
Click the one shaped like a pyramid to open the folder for Attachment Points.
Now along the top bar, open "Render"->"Show Geometry"->Attachment Points
This shows all of the available places to attach objects to on the character, and there's quite a few xD It'd take a long time to test and find out which is which...
But this is interesting... clicking on on of the attachment points will actually tell you which one it is - thank you Blizzard! :D
If you click on one of the points in the folder, the corresponding pyramid on your character will begin to fluctuate in size, letting you know where it is.
Similarly, clicking on an attachment point on the character and then clicking on white space in the folder will highlight the corresponding point name.
----Select the attachment point on the character's left shoulder so it bounces, then click on any empty space under the "Attachment Points" folder. REF_Hardpoint 01 should be highlighted.
Similarly, the right shoulder attachment should point to REF_Hardpoint 02.
Write these down or try to remember them!
*Note: The hardpoints do vary based upon race, with the exception of weapons left/right.
REF_Weapon Left/Right are clearly named and don't need to be discovered.
----Now, I will assume you know the basics of Models and Actors, and if not you should read this tutorial.
----Create a Model of type Generic based on CModel
Set the model to your left shoulder
Do the same for the right shoulder and weapon(s)
Create a Model of type Generic based on GenericUnitBase
Set the model to your character, and turn on Occlusion if you want to seem it behind buildings.
----Now for the actors... either create a Unit actor from scratch, or simply duplicate a pre-existing actor for your character.
Set the model to your character's model.
Now, create a new Actor of type Model based on Model Addition
Set the model to the left shoulder
Set Scale to (2.0,2.0,2.0) (unless you want tiny orc shoulders)
----Under Events, create these events:
-Create
-AnimPlay Attach Stand
-Destroy
----Now under Host, select Actor and set the host to your character's actor.
Under Host Site Operations, add SOpAttachHardPoint02
do the same thing for your right shoulder, only set the Site Operation to SOpAttachHardPoint01
----If you have any weapons, create actors in the same way as the shoulders, only set the Site Operation to SOpAttachWeaponRight and SOpAttachWeaponLeft respectively
Now you should have a character actor that, once attached to a unit, will be complete with shoulders + weapons! (b^.^)b
Note: I did not attach any weapons to my unit, simply because I did not need them for my map.
If there are any errors, let me know
@Feraligono: Go
Thanks for making this, it really helped me learn how to attach my "loose gear" to my wow models. Great guide.
There are some things however that I think you should note in it: not all character models seems to have the same names on the attachments, the broken draenei for example uses hardpoint 3 and 4 for shoulders. And for some reason I had to turn off fog of war on my equipment or it would show as very shady all the time.
Oh and btw, the link to the modelviewer doesn't work for some reason, but the adress is correct
@Feraligono: Go
Nice job on the tutorial! I need to start giving back and write a few myself.
I noticed that when I import my textures/models, I don't need to restart the SC2 Galaxy Editor.
My Steps: 1. Import TEXTURE(S) FIRST as it says above. 2. Save. 3. Import Model. 4. Save.
If you find it crashing, then stick to the OP's method. Also, if anyone is having problems staying under 10MB I'll be writing a tutorial (if one doesnt exist) on how to shrink the size of texture image files down to about 10% of their current size which is 1-2MB for Expansion 2,3 models and 256KB for Original.
@simras
The attachment points seem to be the same when dealing with models from the same expansion and this: "And for some reason I had to turn off fog of war on my equipment or it would show as very shady all the time." BUGGED ME FOR DAYS until I finally figured it out. Some units had the dark attachments and others were fine...drove me nuts. What I wanted to say to you, if you're having problems with the viewer (or even if youre not) is to download each release of the WoW Model viewer and keep them in a directory because some of the older versions will give you different models and export them differently. The newer releases are better M3 files, but they ignore the oldworld.mpq so you miss out on some models.
awesome (b^.^)b
and if you still have the "oldworld.mpq" file on your hard drive (i still do, and it's only 3 days to cataclysm), i believe you can manually add it to the list of mpq files the model viewer uses.
@Feraligono: Go
When I do that, it still ignores it. I noticed while looking at the source code that it's intentional for them to remove the oldworld.mpq models. I am able to use older versions to get those models, however.
Has there been a comment of Blizzard on that topic using wow models in sc2 ?
I'll find sources, but I do know that a map using imported WoW models was featured by Blizzard a few weeks ago and a blue post said it was ok.
I believe I figured out how to import multiple WoW characters using this method...
WoWModelViewer exports the model's texture as "Body.tga", no matter what type of character you export (unless it's a creature, item, or doodad model, such as The Lich King, Thunderfury, or Catapult)
That combined with the inability to import models into different folders means you can effectively only have one working character at a time.
My idea, is to take the "Body.tga" of every character, rename it what you want after exporting it, and import it as usual. After creating the Actor data for each character, I think that using an "Event -> Actor Creation -> Texture Swap" should allow you to apply the texture you need to the model :D
If this works, it should even add more customization to each model, as you can actually swap textures in-game to show the character in different armor!
Great job! I have been looking for this tutorial for weeks!
I have a question, what's a CModel?I play in another language so i would be really happy if someone told me the full name of the model type.
Again...Thx a lot for this tutorial
EDIT: Solved
@Feraligono: Go
Great Tut stumbled across it, thought id try it out and now i have the litch king pwning waves of undead XD
Does your method for importing multiple characters work ( i tried and im not able to find a 'texture swap' when i create and event - actor creation)? cause thats essential for a map im planning on making
thnx
How do you import the textures of multiple characters? they seems to only keep their textures in SC2 if u leave the name of the .tga file as "body" but u cant upload more than 1 "body" without SC2 trying to over right the first. i tried simply renaming the file, but then the texture isnt applied to the model.
Blizzard apparently has some method of texture swapping that they used for the protoss/dark protoss structures
I've been trying to figure out how to replicate that, but it will take some time and I haven't been working with Sc2 in the past few months =(
@MangledMind: Go
I've gotten multiple characters to work by forcing the viewer to export textures to a different directory.
I go into File->Export Model->Export Options and then input, for example, orc_grunt in the texture path. I then export the model as usual and it saves the texture to \orc_grunt.
In the editor I then import the texture and model as usual.
Now, since you told the viewer to export with a texture path, the .m3 expects the texture to be in that path off of root.
In my editor's import module I've got:
orc_grunt.m3
\orc_grunt
I actually put orc_grunt.m3 into the orc_grunt folder in the import module for the sake of organization, but it's not necessary.
So for your next character .m3 you just go back into Export Options and change the directory. This seems to work wonderfully.
Hope this helps! Take care.
@Elenedhel: Go
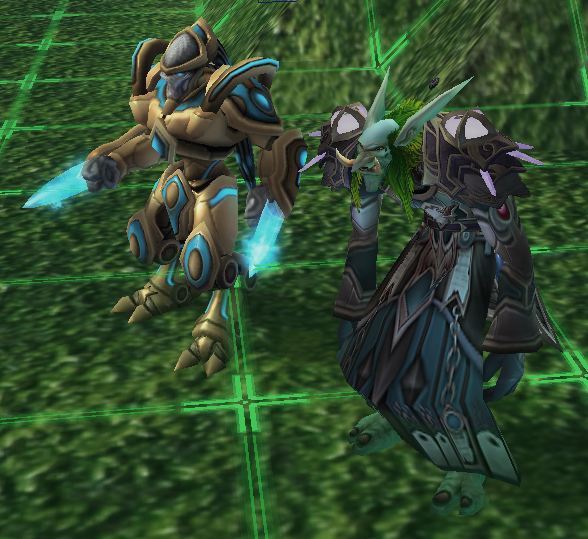
are you sure this works for characters? it looks like npc's
@Feraligono: Go
Yar, you bet. I'll make some screenies to show.
Take care.
EDIT: Ok, here we go...
Note the texture path:
And here are 3 separate character models I successfully imported:
There. Well, I hope that demonstrates the validity of my claim and encourages more of you out there to import multiple character models!
:P
Take care.
EDIT: I just wanted to add as a reminder that the .m3 files do NOT have to be in the same directory as their Body.tga files. When I imported them they were in the root directory and I just stuck them in the folder their .tga was in for organization purposes. Just remember that when you export the .m3 the texture gets a path inside the .m3 where SC2 expects to find it. If you DON'T specify a path (i.e., leave the texture path blank) then the .m3's texture is expected in SC2's root directory. This would be why all of the Body.tga textures conflict and you can only have one at a time.
@Elenedhel: Go
I was wondering what that field was for...
thanks for giving us this information (and saving me some time XD) (b^.^)b
Finally people have away to mass-import highly-customizable Sc2 models :D (space issues are supposedly solved by llou's method)
I may still look into the texture variation method, as it has potential to save space and reduce complexity (have model switch gear without switching models)
@Elenedhel: Go
dude 5 stars man you just saved me from hours of ramming my head into a wall trying to figure out this "texture swap" method. haha awsome dude
Have you been able to get local offsets to work with this method? Everytime I try to add any sort of SiteOp to an attachment on a WoW model it ceases to track with the animations, yet native SC2 models work fine.
@Foolish_Fool: Go
Still not working for me either, but I would like to note that the SiteOps DO work, as long as the model is not in its standing animation. For example, if the unit is running/walking, then the SiteOps seem to work fine and the modelattachment follows the hardpoint. Its only when the unit stops that things fall apart.
For anyone who might know, why is this? Is it something the maker of the wowmodelviewer is working on?
And before I forget I'd like to offer high praise to said maker. The program is awesome. 'Nuff said.
Take care.
EDIT: You can even simulate this by selecting the unit with the modelattachment+siteop, holding down CTRL while left clicking the ground and then holding the button down while dragging your mouse around to turn the unit. As long as you're turning the unit the siteop seems to work.
@Foolish_Fool: Go
odd... I haven't seen that happen. Is it only for the base stand animation?
Are you attaching WoW models to WoW models? Or Sc2 models to WoW models?