Details: This guide features some basic to intermediate design pointers, tips, and explanations, as well as tools and tricks to use in creating a crisp and well-balanced melee addition to the competitive Starcraft 2 scene.
(Thread is expanding; member input encouraged and appreciated. Current state offers tips for people who may be new to melee mapping or do not quite have a grasp on it yet)
Suggested Tools:
Map Analyzer - A great tool for crucial balance statistics and information on the layout of the map.
Resource Websites:
The Planetary Workshop - Features many high-level melee maps from fellow modders like you and I! Use their map pool for inspiration, ideas, pointers, or just to see what the modding community is capable of achieving.
-
Sections
I. General Guidelines II. Aesthetics & Terrain a. Map Setup b. Xel'naga Towers III. Editor Hotkeys & Tricks
(currently trimmed down; author wants final additions to be detailed and accurate)
-
Section I. General Guidelines
Basic question to address:
If there was a definition for the typical melee map, what would it be?
On a general note, a melee map is conceived as a map that uses the gameplay originally developed by the game developer; in terms of Starcraft II map editing, a melee map will have no altered settings to influence the core gameplay of the three main races (there are no custom UI's, units, races, structures, etc), and players will start the game with default melee settings (appropriate starting workers, minerals, supply cap, and command structure – Nexus, Command Center, or Hatchery). A melee map that coincides with the traditional Blizzard melee maps will also follow similar player placement, mineral placement, gas placement, and other aesthetically-related subjects (see section II).
Basic guidelines to follow when designing a player-made melee map:
1. Relate to other Blizzard-made melee maps
Analyze player starting locations in default maps provided by Blizzard as a stepping stone for what essentially makes a melee map balanced and – most importantly – unique from other melee maps, as well as terrain layout and how one side of the map is mirrored to the other. Position of player starting locations is the first key step in providing a basic layout for what type of map is being provided (consider map types as a general term for what type of play style will be most plausible e.g: a map with close starting locations where cheese may be a viable option, a map with large gaps between the players where macro may be an efficient play style, etc). As for terrain, see section II.
2. Be realistic; consider the races at hand
When considering how a map will be played, starting locations are equally important as considering the races that will be playing at said locations. This is where fundamental units, timings, and race structure take an important role. The general rule of thumb with realism as a guideline is to understand what each given race can do if they are allowed to do it.
3. Players will define the map
Players will utilize the resources you have given them and show what can be done with each of the three races. This is where replay value towards balance becomes key. If you are truly seeking a balanced melee map at a high standard, players must test your map for themselves and give reasonable and unbiased feedback. This may require multiple games and much patience; Blizzard utilizes percentage ratios to determine balance on certain maps, perhaps a similar setup would suffice (e.g have a community play 25-50 games per update, and work from there).
Section II: Aesthetics & Terrain
It is important to make a melee map that can be visually appealing as well as considering doodads or objects that may be distracting. This also applies to any custom lightning alterations: in which units may become unfamiliar to the eye based on a different tonal or saturation contrast that players are not normally used to (most likely something that would be caused by extreme overkill such as high luminosity).
On another note, terrain must be placed in a strategic manner aligned with starting locations, while all-the-same paying attention to expansions, high-yield minerals, Xel'naga towers, etc and how each race can react to given strategic locations around the map.
Why is symmetry so important?
A map that is symmetric offers the same advantages and disadvantages (at first sight) to both or all players on the battlefield. Players begin with equal options to execute their strategies. While the races are not constructed on equal terms with one another, and offer mostly unique strategic advantages and play styles to each their own, it is important to note that “If every specialization is balanced against the others, the game is balanced” (Talton @ boardgamegeek.com - great discussions about the reasoning behind balance from actual game designers). In terms of specializations in Starcraft 2, such things as armor types, movement speeds, build times, etc become a major benefactor to the game's balance. It would be accurate to compare Starcraft II to a complex game of chess; in this game of chess, you build your pieces on a board that has been altered, but retains the traditional symmetric layout of many board games that have been competitively popular around the world through the idea of symmetry.
a. Map Setup
Map Sizes
Map sizes, including width and height, can vary based on what type of map it happens to be. If the focused play style is macro, then players will generally be located as far away from each other as possible – taking into account that some maps that can be both 2v2 or 1v1, and are generally used for 1v1 play, may have varying play styles to address in terms of how players' starting positions are placed.
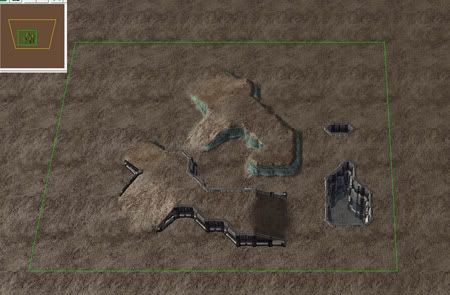
Below is an outline of 'The Shattered Temple', a somewhat popular map for varying 1v1 encounters.
Info Bits:
• Map Size is 160 x 160, with playable map size of 132x134 ('Large')
• Map features 1v1/2v2/FFA, but is popular in 1v1
Generic Overview & Key points
• Map symmetry; the map is mirrored along a diagonal axis (axis running north-west to south-east)
• Xel'naga placement; usually centered, but players can be creative. These towers mostly fulfill a map control type of role.
• Expansions; the map size has to be reasonable for the amount of players and their possible expansion locations. This can lead to large gaps in between certain locations if the map size was too large in the end; or vice versa: a small map with little room for expansions. This is just a small tip to keep in mind. Expansion locations become very important for macro style setups and can determine an accidental benefactor for a given race (a Zerg possibly being able to secure and defend three bases very easily and early in the game- this is where handy destructible rocks placement comes into play)
• “Cutesy” Terrain; terrain that affects micro or has an effect on attack paths. These terrain bits become essential when discovering how players are able to attack each other and what tactics they can utilize in offensive or defensive plays. More about this in section IV: P.1 Terrain.
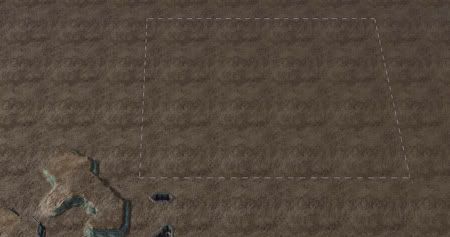
Statistical Map Size & Setup Preferences:
A typical 1v1 map will have at least one natural expansion, one third-base expansion, and possibly rich mineral fields located towards the center of the map, making the rich veins harder to defend (and usually blocked by destructible rocks to delay the timing of acquiring them). In some cases, such as the infamous Tal'darim Altar, both the natural and third base will be relatively close to the starting location of a player, but the third is instead blocked by destructible rocks. These twists in base layout help to make a specific melee map unique from others, and help craft play styles for each race. However, it is important to keep the operation area at an appropriate size (not too small or large) and allow proper placement of objects such as mineral fields and gas.
Starting resources
Mineral Veins: 8
Geysers: 2
The closest mineral vein or geyser should be 3 small blocks (using show small grid) from the player's command structure. This is automatically determined in the editor: the starting location becomes invalid (structure model disappears).
(Notice the loose symmetry of the gas & vein placement)
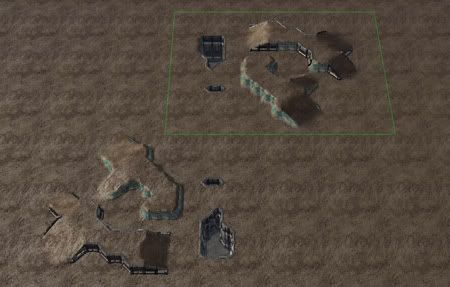
b. Xel'naga Towers
Placement of Xel'naga towers on a map can be threatening to its overall aesthetic appeal. For example, placing a Xel'naga inside a player's base for defensive vision might seem like a good idea, but it's not serving any head-to-head tactical advantage that way.
To get the most out of Xel'naga towers, it is important to keep them within bounds that makes sense for their existence; in other words: they are for map control, so place them where map control can be utilized and provide some kind of advantage for a player. If a tower overlooks an alternate route (and only that route) the purpose of controlling it might not appeal to most players. Most towers are placed either directly in the center of the map or symmetrically aligned with another tower or tower(s). Symmetry is just as important for terrain as it is for basic things such as Xel'naga towers.
Team maps have varying tower placement, but overall a Xel'naga tower's main purpose is to provide map control focusing on the center of the map. Keep this in mind if you are new to melee mapping, it is a basic step to obeying the aesthetic platform of a melee map.
III. Editor Hotkeys and Tricks
The editor provides the hotkey listed next to the tool field, but here are some quick ones that are very helpful.
Horizontally invert: Alt + . (period)
Vertically invert: Alt + , (comma)
Flip -90 degrees: * (numpad)
Flip 90 degrees: / (numpad)
Allow Cliff Merging: Shift + I (useful for adding eye candy cliff sets that use man-made/natural cliff textures)
Rotating terrain:
Some people may be wondering “how the heck does Blizzard get their map symmetry so neat?” The answer is using a logical copy and paste method!
Rotating a terrain piece:
Step 1: Highlight the terrain region you want to mirror.
Step 2: Copy the terrain piece and move it to designated location of your choice.
Step 3: Place the terrain. Select the terrain piece again and use the desired rotation (I used '*' on the numpad a total of two times to rotate 180 degrees).
Useful tip: When pasting a terrain piece (the dotted line placement box) you can use rotating and flipping effects before placing the piece. Also, rotating and flipping works for units and doodads as well (this becomes very handy in making expansions at a quick pace).
These tools can be manipulated in a variety of ways to produce mirrored bases and layouts. In addition, keeping up with hotkeys and using them consistently can greatly increase the speed of which a map can be completed. Go explore!
(Author note: Some details may be missing; these will be filled to the best of my ability, but I want said details to be accurate and efficiently stated)
Cool post; the thought behind melee maps is fun! The reason I've yet to get into it though is because of how finicky you have to be with symmetry and equality for every player. Takes patience...
Thanks dude, really helpful with the copy + pasting terrain trick! I knew it before, but I never knew that's how Blizzard does theirs, and I played around, and now I'm making a really cool map! Very helpful post, thanks!
The Melee Mapping Survival Guide!
Details: This guide features some basic to intermediate design pointers, tips, and explanations, as well as tools and tricks to use in creating a crisp and well-balanced melee addition to the competitive Starcraft 2 scene.
(Thread is expanding; member input encouraged and appreciated. Current state offers tips for people who may be new to melee mapping or do not quite have a grasp on it yet)
Suggested Tools:
Map Analyzer - A great tool for crucial balance statistics and information on the layout of the map.
Resource Websites:
The Planetary Workshop - Features many high-level melee maps from fellow modders like you and I! Use their map pool for inspiration, ideas, pointers, or just to see what the modding community is capable of achieving.
-
Sections
I. General Guidelines
II. Aesthetics & Terrain
a. Map Setup
b. Xel'naga Towers
III. Editor Hotkeys & Tricks
(currently trimmed down; author wants final additions to be detailed and accurate)
-
Section I. General Guidelines
Basic question to address:
If there was a definition for the typical melee map, what would it be?
On a general note, a melee map is conceived as a map that uses the gameplay originally developed by the game developer; in terms of Starcraft II map editing, a melee map will have no altered settings to influence the core gameplay of the three main races (there are no custom UI's, units, races, structures, etc), and players will start the game with default melee settings (appropriate starting workers, minerals, supply cap, and command structure – Nexus, Command Center, or Hatchery). A melee map that coincides with the traditional Blizzard melee maps will also follow similar player placement, mineral placement, gas placement, and other aesthetically-related subjects (see section II).
Basic guidelines to follow when designing a player-made melee map:
1. Relate to other Blizzard-made melee maps
Analyze player starting locations in default maps provided by Blizzard as a stepping stone for what essentially makes a melee map balanced and – most importantly – unique from other melee maps, as well as terrain layout and how one side of the map is mirrored to the other. Position of player starting locations is the first key step in providing a basic layout for what type of map is being provided (consider map types as a general term for what type of play style will be most plausible e.g: a map with close starting locations where cheese may be a viable option, a map with large gaps between the players where macro may be an efficient play style, etc). As for terrain, see section II.
2. Be realistic; consider the races at hand
When considering how a map will be played, starting locations are equally important as considering the races that will be playing at said locations. This is where fundamental units, timings, and race structure take an important role. The general rule of thumb with realism as a guideline is to understand what each given race can do if they are allowed to do it.
3. Players will define the map
Players will utilize the resources you have given them and show what can be done with each of the three races. This is where replay value towards balance becomes key. If you are truly seeking a balanced melee map at a high standard, players must test your map for themselves and give reasonable and unbiased feedback. This may require multiple games and much patience; Blizzard utilizes percentage ratios to determine balance on certain maps, perhaps a similar setup would suffice (e.g have a community play 25-50 games per update, and work from there).
Section II: Aesthetics & Terrain
It is important to make a melee map that can be visually appealing as well as considering doodads or objects that may be distracting. This also applies to any custom lightning alterations: in which units may become unfamiliar to the eye based on a different tonal or saturation contrast that players are not normally used to (most likely something that would be caused by extreme overkill such as high luminosity).
On another note, terrain must be placed in a strategic manner aligned with starting locations, while all-the-same paying attention to expansions, high-yield minerals, Xel'naga towers, etc and how each race can react to given strategic locations around the map.
Why is symmetry so important?
A map that is symmetric offers the same advantages and disadvantages (at first sight) to both or all players on the battlefield. Players begin with equal options to execute their strategies. While the races are not constructed on equal terms with one another, and offer mostly unique strategic advantages and play styles to each their own, it is important to note that “If every specialization is balanced against the others, the game is balanced” (Talton @ boardgamegeek.com - great discussions about the reasoning behind balance from actual game designers). In terms of specializations in Starcraft 2, such things as armor types, movement speeds, build times, etc become a major benefactor to the game's balance. It would be accurate to compare Starcraft II to a complex game of chess; in this game of chess, you build your pieces on a board that has been altered, but retains the traditional symmetric layout of many board games that have been competitively popular around the world through the idea of symmetry.
a. Map Setup
Map Sizes
Map sizes, including width and height, can vary based on what type of map it happens to be. If the focused play style is macro, then players will generally be located as far away from each other as possible – taking into account that some maps that can be both 2v2 or 1v1, and are generally used for 1v1 play, may have varying play styles to address in terms of how players' starting positions are placed.
Below is an outline of 'The Shattered Temple', a somewhat popular map for varying 1v1 encounters.

Info Bits:
• Map Size is 160 x 160, with playable map size of 132x134 ('Large')
• Map features 1v1/2v2/FFA, but is popular in 1v1
Generic Overview & Key points
• Map symmetry; the map is mirrored along a diagonal axis (axis running north-west to south-east)
• Xel'naga placement; usually centered, but players can be creative. These towers mostly fulfill a map control type of role.
• Expansions; the map size has to be reasonable for the amount of players and their possible expansion locations. This can lead to large gaps in between certain locations if the map size was too large in the end; or vice versa: a small map with little room for expansions. This is just a small tip to keep in mind. Expansion locations become very important for macro style setups and can determine an accidental benefactor for a given race (a Zerg possibly being able to secure and defend three bases very easily and early in the game- this is where handy destructible rocks placement comes into play)
• “Cutesy” Terrain; terrain that affects micro or has an effect on attack paths. These terrain bits become essential when discovering how players are able to attack each other and what tactics they can utilize in offensive or defensive plays. More about this in section IV: P.1 Terrain.
Statistical Map Size & Setup Preferences:
A typical 1v1 map will have at least one natural expansion, one third-base expansion, and possibly rich mineral fields located towards the center of the map, making the rich veins harder to defend (and usually blocked by destructible rocks to delay the timing of acquiring them). In some cases, such as the infamous Tal'darim Altar, both the natural and third base will be relatively close to the starting location of a player, but the third is instead blocked by destructible rocks. These twists in base layout help to make a specific melee map unique from others, and help craft play styles for each race. However, it is important to keep the operation area at an appropriate size (not too small or large) and allow proper placement of objects such as mineral fields and gas.
Starting resources
Mineral Veins: 8
Geysers: 2
The closest mineral vein or geyser should be 3 small blocks (using show small grid) from the player's command structure. This is automatically determined in the editor: the starting location becomes invalid (structure model disappears).
(Notice the loose symmetry of the gas & vein placement)
b. Xel'naga Towers
Placement of Xel'naga towers on a map can be threatening to its overall aesthetic appeal. For example, placing a Xel'naga inside a player's base for defensive vision might seem like a good idea, but it's not serving any head-to-head tactical advantage that way.
To get the most out of Xel'naga towers, it is important to keep them within bounds that makes sense for their existence; in other words: they are for map control, so place them where map control can be utilized and provide some kind of advantage for a player. If a tower overlooks an alternate route (and only that route) the purpose of controlling it might not appeal to most players. Most towers are placed either directly in the center of the map or symmetrically aligned with another tower or tower(s). Symmetry is just as important for terrain as it is for basic things such as Xel'naga towers.
Team maps have varying tower placement, but overall a Xel'naga tower's main purpose is to provide map control focusing on the center of the map. Keep this in mind if you are new to melee mapping, it is a basic step to obeying the aesthetic platform of a melee map.
III. Editor Hotkeys and Tricks
The editor provides the hotkey listed next to the tool field, but here are some quick ones that are very helpful.
Horizontally invert: Alt + . (period)
Vertically invert: Alt + , (comma)
Flip -90 degrees: * (numpad)
Flip 90 degrees: / (numpad)
Allow Cliff Merging: Shift + I (useful for adding eye candy cliff sets that use man-made/natural cliff textures)
Rotating terrain:
Some people may be wondering “how the heck does Blizzard get their map symmetry so neat?” The answer is using a logical copy and paste method!
Rotating a terrain piece:
Step 1: Highlight the terrain region you want to mirror.
Step 2: Copy the terrain piece and move it to designated location of your choice.
Step 3: Place the terrain. Select the terrain piece again and use the desired rotation (I used '*' on the numpad a total of two times to rotate 180 degrees).
Useful tip: When pasting a terrain piece (the dotted line placement box) you can use rotating and flipping effects before placing the piece. Also, rotating and flipping works for units and doodads as well (this becomes very handy in making expansions at a quick pace).
These tools can be manipulated in a variety of ways to produce mirrored bases and layouts. In addition, keeping up with hotkeys and using them consistently can greatly increase the speed of which a map can be completed. Go explore!
(Author note: Some details may be missing; these will be filled to the best of my ability, but I want said details to be accurate and efficiently stated)
Cool post; the thought behind melee maps is fun! The reason I've yet to get into it though is because of how finicky you have to be with symmetry and equality for every player. Takes patience...
-
View User Profile
-
View Posts
-
Send Message
ModeratorsReally nice post, Xeno. Stickied, ;).
Thanks dude, really helpful with the copy + pasting terrain trick! I knew it before, but I never knew that's how Blizzard does theirs, and I played around, and now I'm making a really cool map! Very helpful post, thanks!
Nice tutorial. I knew about copy+paste, but had no idea it could be used to rotate/flip the terrain.
Wow. I wish I knew about rotating parts of terrain a long time ago. Does it work with groups of doodads and units as well?
Tudo isto é de facto muito interessante. Obrigado ao autor do tópico.